
Unlocking your VoIP Success one step at a time
Setting up FreePBX for the first time can seem daunting, but with a step-by-step approach, you can easily get your PBX system up and running. FreePBX is a free, open-source interface that manages Asterisk, a powerful and flexible voice-over IP (VoIP) server. In the rest of this tutorial, we shall look at the critical steps of the setup process that a user needs to go through to reap the benefits of FreePBX.
Installing FreePBX
First and foremost, to proceed with this guide, ensure you have a fully installed and updated FreePBX system. For a quick and hassle-free start, we provide pre-configured Cloud Images, offering a reliable and production-ready FreePBX installation. The best part? These images are readily accessible on your favourite cloud platforms. Use the links below to set up your FreePBX system, and once that’s complete, return to this tutorial to continue.
| FreePBX v16 |  |  | ||
| FreePBX v17 | | |
Step 1: Accessing the FreePBX Administration Interface
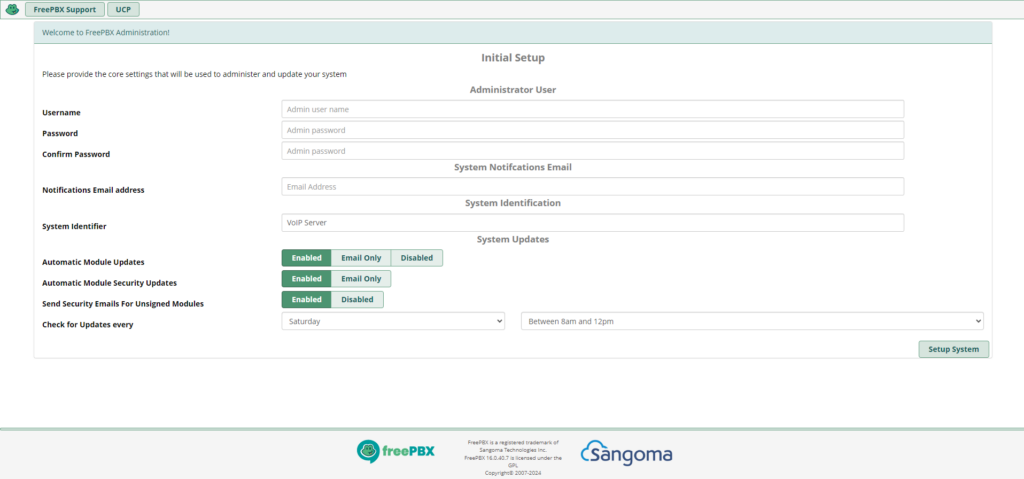
After installation, you will be presented with the IP address of your FreePBX system. This can be obtained from the cloud portal of your chosen provider. Type this IP address into a web browser on a computer connected to the Internet, e.g., http://1.2.3.4. You will be directed to the FreePBX initial set-up screen. On this page, you will be allowed to set up administrator information. Please note the username and password, as you will be using those in the next sections.
If you have connectivity issues at this point, it is worth looking at security groups on your FreePBX instance and making sure ports 80/TCP and 443/TCP are accessible.
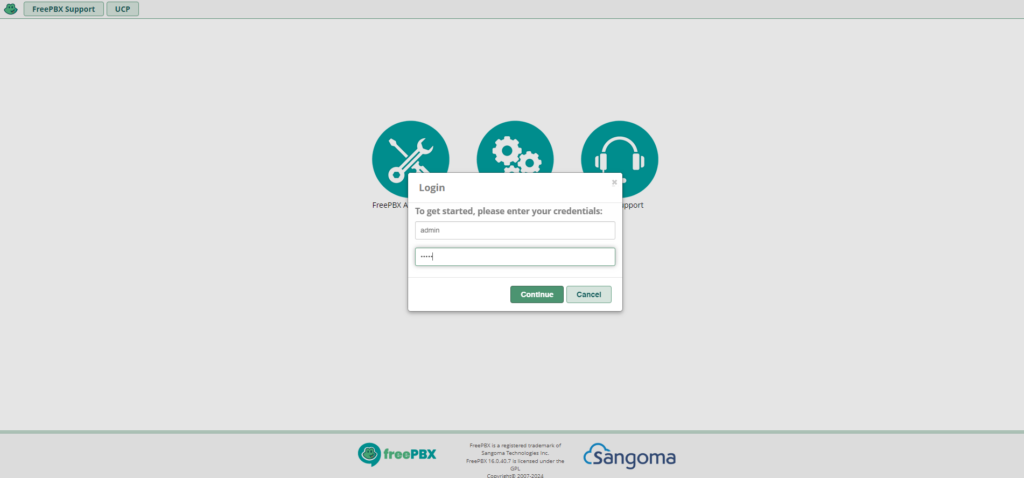
When you finish the initial setup, you should be returned to the screen below, where you can log into your FreePBX system for the first time.
Apply Configuration Changes
As you make changes in the FreePBX UI, those changes are staged but not applied automatically. Look for the “Apply Config” button at the top of the screen. Clicking this will apply your configuration changes. It’s a good practice to apply changes to avoid a pile-up of unapplied settings.
Step 2: Setting Up Users (Extensions)
In FreePBX and Asterisk, extensions serve as individual endpoints, acting like internal phone lines for users within your organization. It’s important to note that as you navigate through FreePBX and Asterisk documentation or forums, you might notice the terms “users” and “extensions” being used somewhat interchangeably. This terminology overlap stems from the system’s flexibility in handling internal call routing and identification. An extension is a specific endpoint within the PBX system, typically associated with a device or software client. On the other hand, a user is often considered the individual utilizing the phone or device. However, in the context of FreePBX and Asterisk, an extension can directly represent a user, hence the interchangeable use of these terms. Understanding this will help you better navigate the setup process and any documentation you encounter.
To set up an extension in FreePBX:
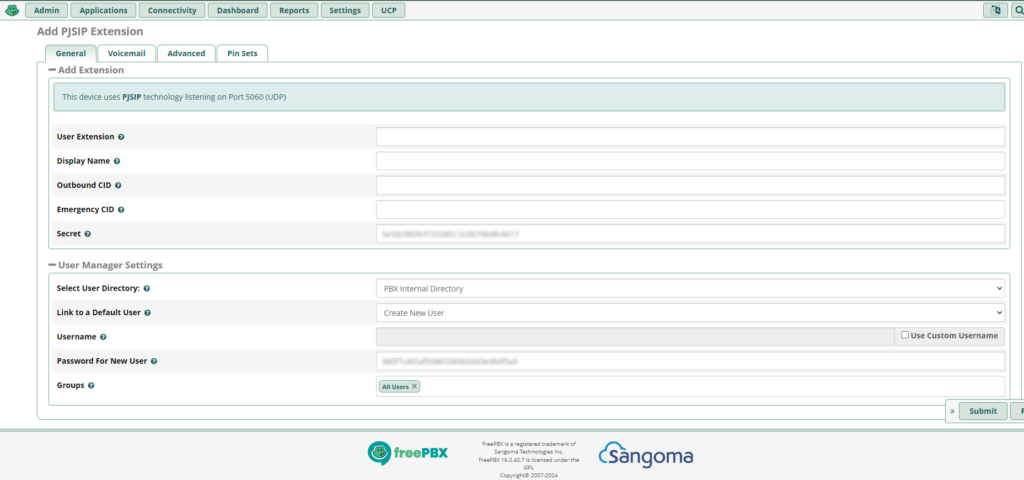
- Navigate to the “Applications” menu and select “Extensions”
- Click on “Add New Extension” and choose the type of device you’re setting up — For this tutorial, we shall set up a PJSIP (Session Initiation Protocol) extension. Fill in the necessary details for your extension. Key fields include;
- “User Extension,” which is the number assigned to this endpoint
- The “Display Name” for easy identification
- The “Secret” is essentially the password for this extension. It is critical for registering your device with the PBX and ensuring secure communication.
Remember to apply your configuration changes immediately after setting up or modifying extensions. This action updates the system’s running configuration and activates your configured extensions.
At this point, you should be able to use a SIP client to connect to FreePBX. The details you will require are the IP or Domain name of the FreePBX system along with the “User Extension” as username and “Secret” as the Password.
Step 3: Outbound and Inbound Routes
What purpose does a phone system serve without contacts to reach out to? Presumably, the goal behind setting up FreePBX is to enable interactions with people internally and externally outside your immediate network. To make this possible, it’s essential to establish both outbound and inbound communication routes.
Outbound Routes
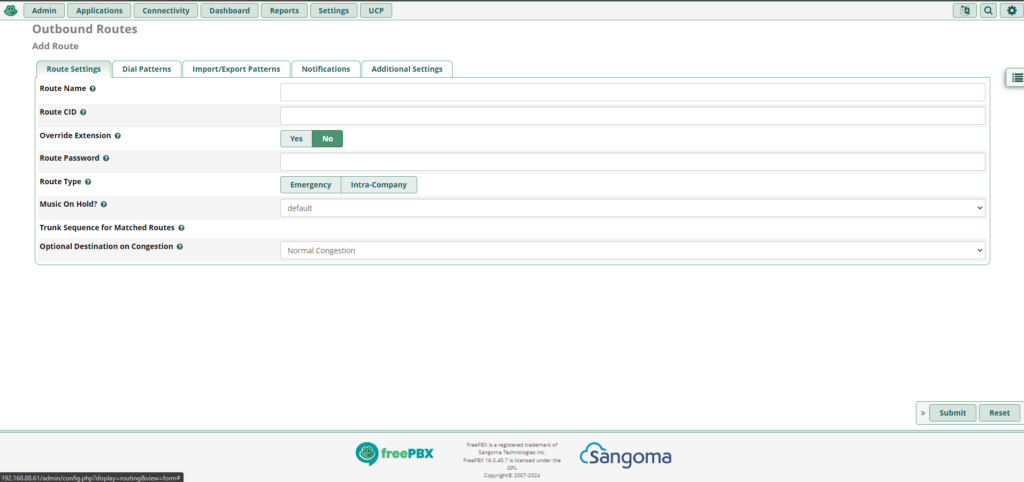
Outbound routes are a fundamental component of your FreePBX system, as they are the bridge connecting your internal network to the external telephone network. By configuring outbound routes, you define the rules and paths your calls will follow to reach destinations outside your organization. To begin setting up outbound routes, navigate to Connectivity > Outbound Routes to set this up.
To configure an Outbound Route, you need;
Route Name: This name helps you identify the route’s purpose or the type of calls it handles, such as local, long-distance, or international calls.
Dial Patterns: Dial patterns are critical to outbound routing as they determine which numbers will be routed through this path. These patterns can include wildcards and specific digit sequences to match various phone numbers. For example, you might set a dial pattern that captures all numbers starting with a particular country or area code, directing these calls through a specified route.
Trunk Selection: A trunk is a physical or virtual line connecting your PBX to the external phone network. When setting up an outbound route, you must specify which trunk(s) the calls matching your dial patterns should use. If you have multiple trunks, you can prioritize them, so if the primary trunk is unavailable, the call will attempt to go through the next available trunk in your list.
Inbound Routes
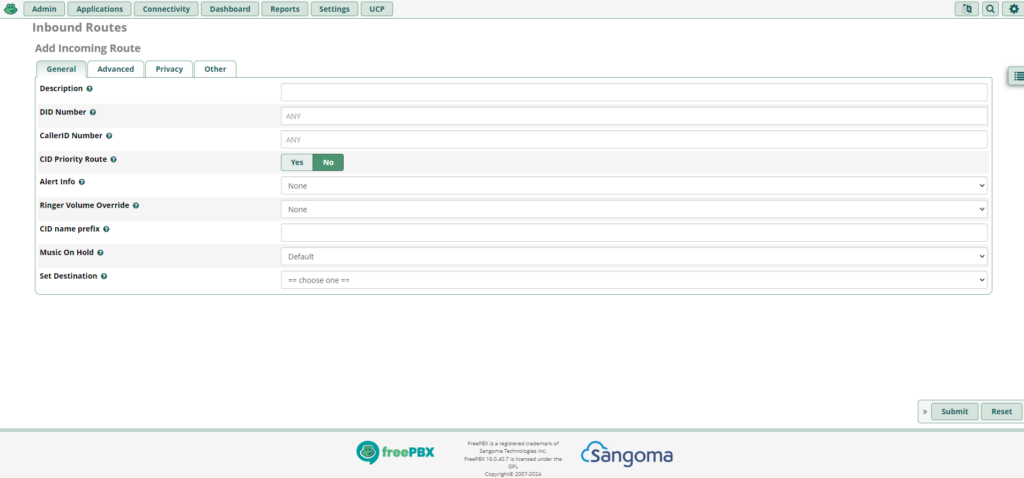
Inbound Routes are equally crucial to the functionality of your FreePBX system. They serve as the gatekeepers for calls coming into your organization from the external world. These routes dictate how incoming calls are handled and directed within your network, ensuring callers reach the intended recipient or department. To configure your inbound routes, you will navigate to “Connectivity” and then select “Inbound Routes.” This area allows you to manage the rules and paths for incoming calls, setting the stage for how your system interacts with the outside world.
To set an Inbound route, the following needs to be set as a minimum
DID Number: The Direct Inward Dialing (DID) number is a unique number callers use to reach your PBX system. When setting up an inbound route, you can specify one or more DID numbers. This tells the PBX system that calls to these numbers should be handled according to the route’s configuration.
Caller ID: You can optionally specify Caller ID information to create more targeted routing rules. For example, you might route calls from specific numbers or area codes to different destinations within your organization based on caller ID.
Destination: The most critical part of setting up an inbound route is defining its destination. This could be an extension, ring group, call queue, auto attendant (IVR), or any other destination within your FreePBX system. The destination determines where the call will be directed once it reaches your PBX.
Step 4: Trunks
In telecommunication terms, a trunk is a line or link designed to carry multiple signals simultaneously to provide network access between two points. Trunks are pivotal in bridging your FreePBX system with the external telephony world, serving as the primary conduits for incoming and outgoing calls. They are the backbone of your communication system, connecting your FreePBX to service providers via the internet (VoIP) or conventional phone lines. Here’s a deeper look into what trunks are and how to add them to your FreePBX setup:
Types of Trunk
SIP Trunks: Session Initiation Protocol (SIP) trunks use the Internet to connect your FreePBX with a Voice communication vendor. They are flexible, scalable, and often more cost-effective than traditional lines, making them a popular choice for modern businesses.
Analog Trunks: These traditional phone lines connect to FreePBX using physical wires. While less common in new installations due to the prevalence of VoIP solutions, they are still used in specific scenarios, especially where internet connectivity is unreliable.
PRI Trunks: Primary Rate Interface (PRI) trunks are digital trunk lines that provide multiple voice and data transmission channels over a single line. They are typically used by larger organizations with higher call volumes. If you are looking for a more specific guide on adding trunks, we have a guide on how to add Twilio as a SIP Trunk.
Adding a Trunk in FreePBX
To integrate a trunk with your FreePBX system, navigate to “Connectivity” > “Trunks.” and follow these general steps:
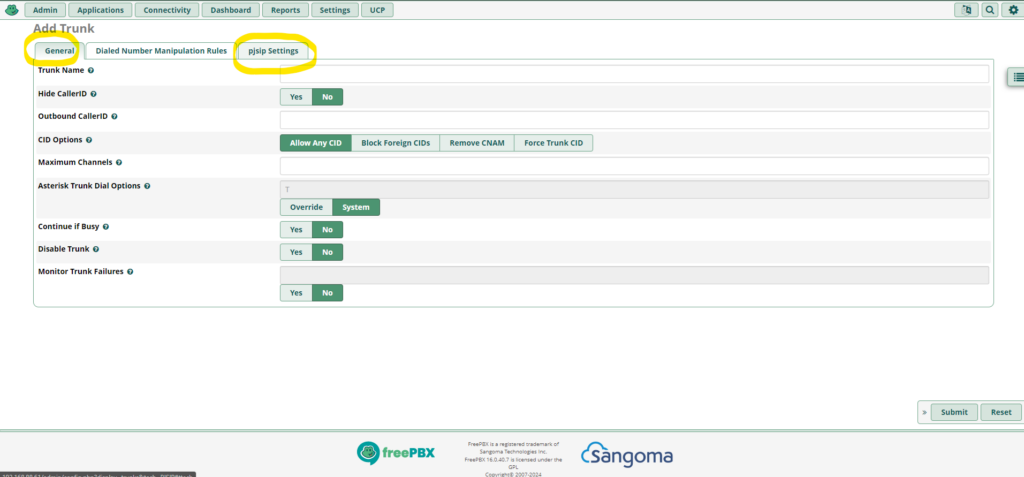
Add New Trunk: Click on the “Add Trunk” option. You will be prompted to select the type of trunk you wish to add, such as SIP, IAX (Inter-Asterisk eXchange), or DAHDI for analog lines.
Configure Trunk Settings: For SIP trunks, you’ll need to input the trunk name and the SIP settings (PJSIP Settings tab) provided by your VoIP provider. These settings typically include the trunk’s hostname or IP address (SIP server), the username and password for authentication, and possibly a registration string if your provider requires it. Accurate configuration is crucial for establishing a reliable connection.
Dial Patterns and Routes: After setting up the trunk, you need to configure dial patterns and assign outbound/inbound routes to it. This tells the PBX how to use this trunk to place or receive calls.
Apply Changes: Remember to apply the changes once you configure the trunk and associated routes. It’s advisable to test the trunk by making inbound and outbound calls to ensure it’s functioning correctly.
Step 5: Testing Your Setup
Finally, test your setup to ensure everything is working correctly. Make internal calls between extensions, place outbound calls, and check that inbound calls reach their intended destination.
Troubleshooting Common Issues
One-Way Audio in FreePBX
One-way audio is a common issue in which one person can hear the other but not the other way around. This is often caused by NAT (Network Address Translation) issues or firewall settings blocking media traffic (RTP).
🔍 Common Causes of One-Way Audio:
- Improper NAT settings
- RTP ports (media ports) blocked by firewall
- External IP / Local Network not configured in FreePBX
- SIP ALG is enabled on your router
- Incorrect port forwarding setup
✅ How to Fix One-Way Audio in FreePBX
1. Set NAT Settings Correctly
Go to:
Settings > Asterisk SIP Settings
Under the General SIP Settings tab:
- Set External Address to your public IP (use a Dynamic DNS if needed).
- Set Local Networks to match your LAN (e.g.
192.168.1.0/24). - Click Detect Network Settings to auto-fill these values if unsure.
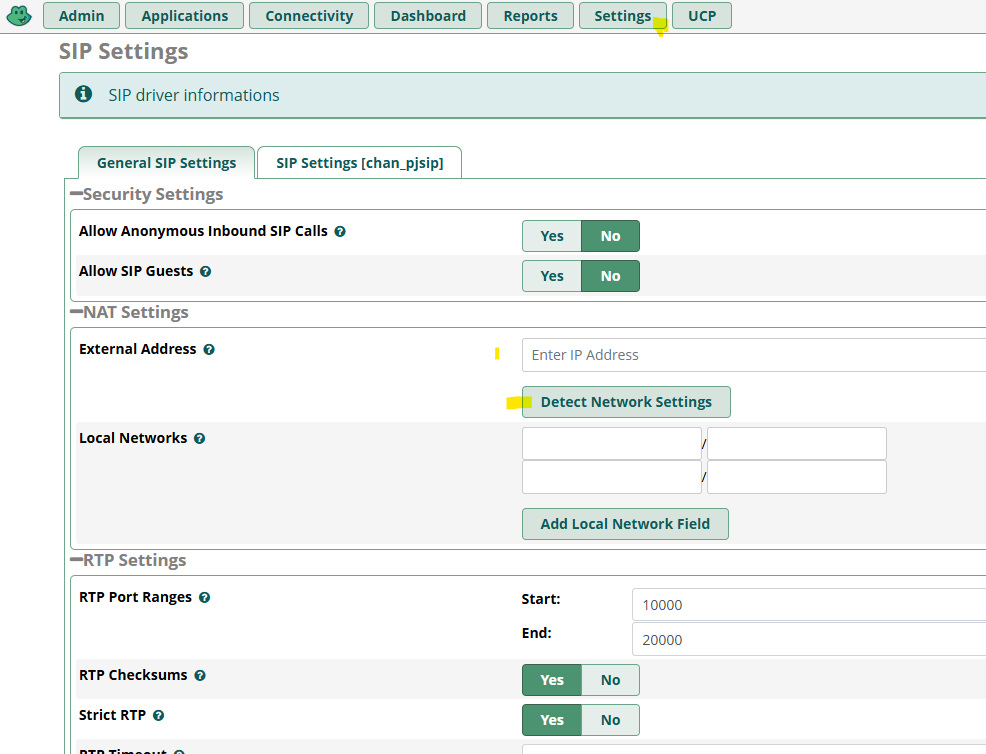
2. Check RTP Port Range
Also, under Asterisk SIP Settings, make sure:
- The RTP Port Range (default:
10000-20000) is open in your firewall. - Make sure you have a security group allowing RTP ports above
The rules below allow all devices on the internet to connect to your FreePBX box, be sure to limit access from your known networks to avoid risk.
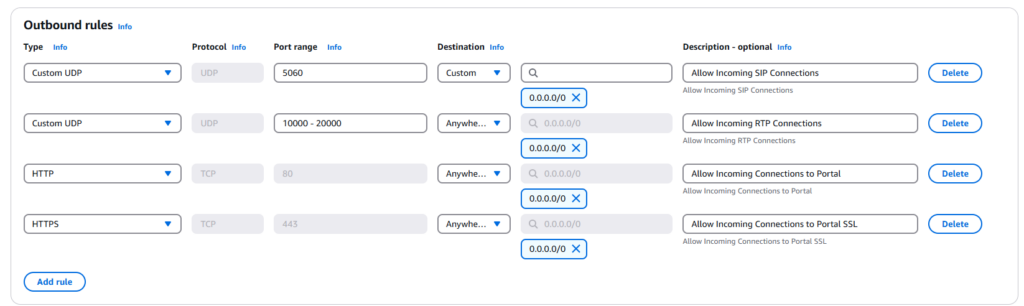
3. Configure Firewall
- If using FreePBX’s built-in firewall, ensure the Internet Zone allows SIP and RTP.
- Your external network firewall (router) must allow:
- UDP 5060 (for SIP signaling)
- UDP 10000-20000 (for RTP/media)
4. Disable SIP ALG on Your Router
SIP ALG often interferes with VoIP traffic.
- Log in to your router/firewall settings.
- Disable SIP ALG (look under “Advanced” or “NAT” settings — location varies by device).
5. Extension-Specific NAT Settings
Go to:
Applications > Extensions > [Your Extension]
Under the Advanced tab:
- Set NAT to
YesorYes - Force Rport(depending on your setup). - Ensure Transport is set to
UDPunless instructed otherwise by your provider.
🧪 Test After Making Change
After updating settings:
- Run:
fwconsole restartIn the terminal. - Reboot your VoIP phones or softphones.
- Make test calls (internal and external) to verify audio works in both directions.
📌 Bonus: Use SIP Debugging in the CLI
To analyze SIP messages and RTP flow, open the Asterisk CLI and run:
sip set debug onor (for PJSIP systems):
pjsip set logger onLook for signs of missing audio streams, blocked ports, or incorrect IP addresses in SIP headers.
Conclusion
Setting up FreePBX requires careful attention to detail but is not beyond the reach of beginners willing to learn. By following this guide, you’ll have a basic but operational PBX system set up. Remember, the VoIP world is vast and complex, so continue to explore FreePBX features and configurations to tailor your system to your needs.
Further Reading
FreePBX 16 vs 17: A Detailed Comparison of New Features and Improvements.
FreePBX: How to Create a SIP Trunk with Twilio
FreePBX on Azure – Getting Started
FreePBX on AWS – Getting Started
Enabling Call Detail Records in FreePBX WebUI
Did You Just Read Gibberish?
Our Tech Support Staff understand gibberish and would love to work with you. Your business needs you, lets take care of the backend stuff.
Gibberish Helpline