
Introduction
In the digital age, transferring files between a local machine and a server is a common task. Whether you’re managing a website, uploading documents, or sharing resources, the method of transfer is crucial. This is where SFTP (Secure File Transfer Protocol) comes into play. SFTP is a secure version of the File Transfer Protocol (FTP), which was widely used in the past. Unlike FTP, SFTP encrypts both commands and data, preventing passwords and sensitive information from being transmitted openly over the network. This makes SFTP not only preferable but essential in maintaining data security.
Why SFTP Over FTP?
The primary reason for choosing SFTP over FTP is security. FTP transmits data in an unencrypted form, making it susceptible to interception and attacks. SFTP, on the other hand, uses SSH (Secure Shell) to provide a secure channel. This encryption ensures that your data, including login credentials, is kept confidential and secure from unauthorized access. The rest of this document will show you how you can use WinSCP a Windows utility and or “sftp” in Linux to transfer files to and from your webserver.
Uploading Files with WinSCP on Windows
WinSCP is a popular free SFTP client for Windows. It provides a user-friendly graphical interface to securely transfer files to and from a server.
Getting Started with WinSCP
- Download and Install WinSCP: Visit the WinSCP website and download the installation package. Follow the setup instructions to install it on your Windows machine.
- Open WinSCP: Launch the program. You will be greeted with a login window.
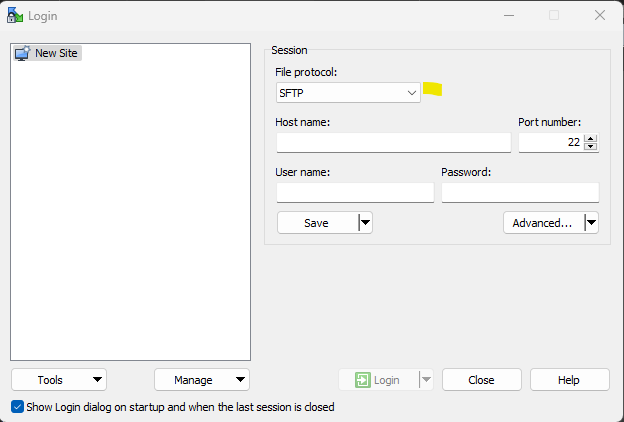
3. Configure Your Connection:
- Host name: Enter the server’s address.
- Port number: Typically, SFTP uses port 22.
- User name: Your server’s username.
- Password: The password associated with the username.(You can use ssh-key as well)
- File protocol: Choose SFTP.
4. Connect to the Server: Click ‘Login’. If this is your first time connecting, you may receive a security alert about the server’s host key; accept it to proceed.
5. Upload Files:
- Once connected, you’ll see two panels: the left shows your local files, and the right shows the server’s files.
- Drag and drop files from your local machine (left panel) to the server (right panel).
6. Transfer Status: A window will appear showing the progress of your file upload. Once complete, your files will be securely transferred to the server.
Uploading Files with SFTP CLI on Linux
For Linux users, SFTP can be easily accessed through the command line interface (CLI), providing a powerful and scriptable way of transferring files.
Using the SFTP Command
- Open Terminal: Access the terminal on your Linux system.
- Start SFTP Session: Enter the following command:
If you are using username and passwordsftp username@hostname
If you are using username and ssh-keysftp -i /location/of/ssh-key.pem username@hostname
Replaceusernamewith your server username andhostnamewith the server’s address. - Upload Files:
- Navigate to the directory where you want to upload files using
cdcommand. - Use the
putcommand to upload a file:
put /path/to/local/fileReplace/path/to/local/filewith the path to the file you want to upload.
- Navigate to the directory where you want to upload files using
- Exit SFTP Session: Type
exitto end your SFTP session.
Conclusion
SFTP provides a secure and reliable method for transferring files to a server. Whether you’re a Windows user preferring a graphical interface like WinSCP or a Linux enthusiast comfortable with the command line, SFTP ensures your data is transferred securely. By encrypting the data, SFTP guards against the vulnerabilities inherent in the older FTP protocol, making it a smart choice for anyone concerned with data security.
Do you still need help?
Look, our Tech Support Staff live and breathe Cloud Engineering. Let them handle the details, so you can focus on the big picture.
Contact Support