This guide shows How To Setup a SSH Jump Host (Bastion Host) on Azure: A Step-By-Step Guide.
Overview
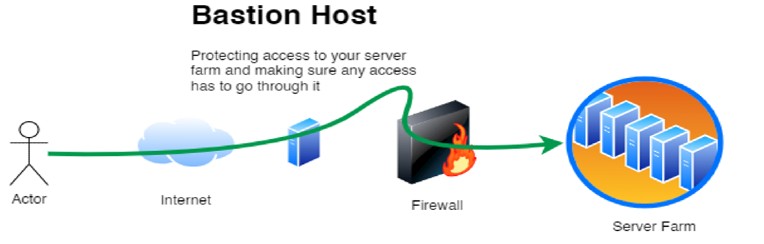
A Bastion Host also known as a Jump Host, SSH Jump Host, or Jump Server is a hardened VM used to securely access private workloads inside a virtual network. Rather than opening SSH access to every VM, you route connections through a single controlled entry point.
This guide walks through deploying a Jump Host / Bastion Host on Microsoft Azure, securing it with proper network rules, and connecting from Linux/macOS and Windows (PuTTY included as a small optional section).
What Is a Bastion Host / Jump Host?
A Bastion Host (Jump Host) is a public-facing Linux VM designed to securely forward SSH traffic into private subnets within an Azure Virtual Network (VNet).
It provides:
- A single hardened access point
- Reduced attack surface (private VMs stay isolated)
- Easier auditing and logging of SSH access
- Integration with automation (Terraform, Ansible, ARM/Bicep)
- Compatibility with any OS or SSH workflow
This setup mirrors traditional on-premises jump boxes but leverages Azure networking.
Bastion hosts provide a simple and secure way to connect to your servers without VPNs. With intrusion protection, multi-system support and key authentication, you can ensure that authorised persons only access your servers. Bastion hosts are fully managed and highly available, so you can focus on your core responsibilities while we take care of the rest. Keep security and ease of use; launch your Bastion host today.

Why use this image?
This image comes pre-packaged with the security best practices below:
- Disabled password authentication (keys only)
- Fail2ban installed
- Unused packages removed
- All SSH sessions are logged
- Ready for integration with SIEM for monitoring
- Ready for MFA protected SSH (e.g., Duo, Okta, or PAM-based solutions)
Connecting Through the SSH Jump Host
Method 1: SSH ProxyJump (simple & recommended)
ssh -J azureuser@JUMP_PUBLIC_IP azureuser@10.0.2.15Using your private key:
ssh -i ~/.ssh/id_rsa -J azureuser@JUMP_PUBLIC_IP azureuser@10.0.2.15Method 2: Using ~/.ssh/config
Host jump
  HostName JUMP_PUBLIC_IP
  User azureuser
  IdentityFile ~/.ssh/id_rsa

Host private-vm
  HostName 10.0.2.15
  User azureuser
  ProxyJump jump
Now connect simply with:
ssh private-vmThis is the cleanest way to use an SSH Jump Host in Azure.
Connecting Through a Jump Host Using Windows (PuTTY)
For Windows-based engineers:
- Open PuTTY
- Set the private VM IP as the target
- Go to:
Connection → SSH → Tunnels - Use Plink for proxying:
plink.exe -ssh azureuser@JUMP_PUBLIC_IP -i yourkey.ppk - Save profile
- Connect: PuTTY will automatically route traffic through the Jump Host
Summary
A Bastion Host / SSH Jump Host on Azure provides a secure gateway into your private VNets by limiting SSH access to a single VM. This guide covered:
- Architecture and benefits
- Deploying a Jump Host VM
- Securing NSGs
- SSH connections via ProxyJump
- Optional PuTTY instructions
- Hardening and cost-saving tips
Using a Jump Host is the recommended method for secure server administration in Azure environments.
Disclaimer:
All product and company names are trademarks™ or registered® trademarks of their respective holders. Use of them does not imply any affiliation with or endorsement by them. This product contains the latest patched software from individual vendors; we do not claim that all vulnerabilities have been addressed.
Do you still need help?
Look, our Tech Support Staff live and breathe Cloud Engineering. Let them handle the details, so you can focus on the big picture.
Contact Support