If you’ve got a stable Proxmox environment and want a realistic OpenShift lab that behaves like a “real” on-prem install, you’ll quickly discover that OpenShift expects a few infrastructure building blocks: DNS, DHCP, and load balancing for the Kubernetes API and Ingress. The good news is you can build all of that on a single Proxmox host using lightweight tools.
This guide starts from a working Proxmox installation (I used a machine with 512GB RAM and a 36-core Intel CPU) and walks you through:
- Creating an isolated Proxmox bridge network for your OpenShift nodes
- Enabling NAT + IP forwarding so nodes can reach the internet
- Using dnsmasq for DHCP + DNS in a lab-friendly way
- Using HAProxy to load-balance OpenShift API and Ingress traffic (ports 6443/22623/80/443)
- Booting your OpenShift nodes from the Red Hat Assisted / Agent-based ISO workflow
This guide intentionally does not cover installing Proxmox itself. It assumes Proxmox is stable and reachable.
Architecture at a glance
You’ll end up with:
- Proxmox host
- Bridge network:
10.20.20.0/24 - NAT out through your physical NIC (example:
enp6s0) - dnsmasq provides DHCP + DNS for the OpenShift nodes
- HAProxy provides load balancing for:
- Kubernetes API: 6443
- Machine Config Server: 22623
- Ingress HTTP/HTTPS: 80/443
- Bridge network:
- OpenShift cluster nodes
- 3 x masters:
10.20.20.50-52 - 3 x workers:
10.20.20.70-72
- 3 x masters:
Step 1: Create a dedicated Proxmox bridge for OpenShift
In Proxmox UI:
Datacenter → Node (your Proxmox) → System → Network
Create a new Linux bridge (example: vmbr0). Assign it a static gateway IP:
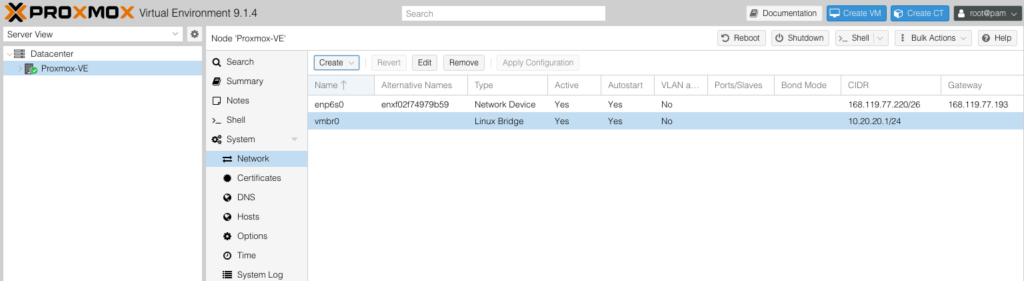
Apply your settings.
At this point, you can access Proxmox cli to make sure the network interfaces are configured correctly and to add NAT rules and enable IP forwarding to support the new brigde. This is what my bridge interface looks like.
auto vmbr0
iface vmbr0 inet static
    address 10.20.20.1/24
    bridge-ports none
    bridge-stp off
    bridge-fd 0

    post-up   echo 1 > /proc/sys/net/ipv4/ip_forward
    post-up   iptables -t nat -A POSTROUTING -s '10.20.20.0/24' -o enp6s0 -j MASQUERADE
    post-down iptables -t nat -D POSTROUTING -s '10.20.20.0/24' -o enp6s0 -j MASQUERADE
Restart networking:
systemctl restart networkingConfirm NAT rule exists:
iptables -t nat -LYou should see:
MASQUERADE all -- 10.20.20.0/24 anywhereWhy this matters: your OpenShift nodes must reach external endpoints during installation (registries, mirrors, assisted services, etc.). NAT makes that possible even in an isolated lab network.
Step 2: Create your OpenShift VMs (but don’t boot them yet)
Create 6 VMs (this is for a HA installation. If you are interested in leaner installations, you might be able to get away with fewer machines):
master0,master1,master2worker0,worker1,worker2
Important notes while creating VMs:
- Attach them to your OpenShift bridge (
vmbr0) - Choose “use physical CD/DVD Drive” temporarily (you’ll replace it with the installer ISO later)
- Do not start them yet — you first want their MAC addresses so you can assign static IPs via DHCP
Once you have provisioned the VMS capture their MAC addresses right from the Proxmox UI. From my lab, these were my values.
Masters
- master0 =
BC:24:11:40:DC:73 - master1 =
BC:24:11:A5:6E:21 - master2 =
BC:24:11:50:6C:AA
Workers
- worker0 =
BC:24:11:E7:25:3D - worker1 =
BC:24:11:A5:03:63 - worker2 =
BC:24:11:48:B8:A3
This is a classic lab technique: static DHCP assignments give you predictable IPs without manually configuring each node.
Step 3: Install and configure dnsmasq (DHCP + DNS)
dnsmasq is perfect for lab environments because it can do DHCP + DNS forwarding with minimal effort.
Install on the Proxmox node:
apt update
apt install -y dnsmasq
Edit config:
vi /etc/dnsmasq.confAppend:
# Listen only on the OpenShift lab bridge
interface=vmbr0

# DHCP range for lab
dhcp-range=10.20.20.100,10.20.20.250,12h
dhcp-option=3,10.20.20.1              # Default gateway
dhcp-option=6,10.20.20.1,8.8.4.4      # DNS servers
dhcp-option=15,demo.io               # Domain name (important)

# Domain settings
domain=demo.io
expand-hosts
local=/demo.io/

# OpenShift API and apps DNS (typical OpenShift expectations)
address=/api.oc.demo.io/10.20.20.5
address=/api-int.oc.demo.io/10.20.20.5
address=/apps.oc.demo.io/10.20.20.6

# Static DHCP assignments with hostnames
dhcp-host=BC:24:11:40:DC:73,10.20.20.50,master0
dhcp-host=BC:24:11:A5:6E:21,10.20.20.51,master1
dhcp-host=BC:24:11:50:6C:AA,10.20.20.52,master2
dhcp-host=BC:24:11:E7:25:3D,10.20.20.70,worker0
dhcp-host=BC:24:11:A5:03:63,10.20.20.71,worker1
dhcp-host=BC:24:11:48:B8:A3,10.20.20.72,worker2

# etcd hostnames (useful for UPI-style DNS completeness)
address=/etcd-0.oc.demo.io/10.20.20.50
address=/etcd-1.oc.demo.io/10.20.20.51
address=/etcd-2.oc.demo.io/10.20.20.52
Restart dnsmasq:
systemctl restart dnsmasq.service
systemctl status dnsmasq --no-pager
A quick DNS reality-check
OpenShift commonly expects:
api.<cluster>.<baseDomain>→ API VIP / load balancerapi-int.<cluster>.<baseDomain>→ internal API VIP / load balancer*.apps.<cluster>.<baseDomain>→ ingress VIP / load balancer
NOTE: To make life easier, you can create a wildcard DNS entry on your external dns server and point it to the Proxmox box, the will make it seamless when you start creating applications that automatically get assigned hostnames.
Step 4: Configure HAProxy for API + MCS + Ingress
Install HAProxy on the Proxmox host:
apt install -y haproxyEdit:
vi /etc/haproxy/haproxy.cfgMake it similar to:
global
  log /dev/log local0
  maxconn 20000

defaults
  mode tcp
  timeout connect 5s
  timeout client  50s
  timeout server  50s

# Kubernetes API (control plane)
frontend k8s_api
  bind *:6443
  default_backend k8s_api_be
backend k8s_api_be
  balance roundrobin
  server m0 10.20.20.50:6443 check
  server m1 10.20.20.51:6443 check
  server m2 10.20.20.52:6443 check

# Machine Config Server (during install)
frontend mcs
  bind *:22623
  default_backend mcs_be
backend mcs_be
  balance roundrobin
  server m0 10.20.20.50:22623 check
  server m1 10.20.20.51:22623 check
  server m2 10.20.20.52:22623 check

# Ingress HTTP
frontend apps_http
  bind *:80
  default_backend apps_http_be
backend apps_http_be
  balance roundrobin
  server w0 10.20.20.70:80 check
  server w1 10.20.20.71:80 check
  server w2 10.20.20.72:80 check

# Ingress HTTPS
frontend apps_https
  bind *:443
  default_backend apps_https_be
backend apps_https_be
  balance roundrobin
  server w0 10.20.20.70:443 check
  server w1 10.20.20.71:443 check
  server w2 10.20.20.72:443 check
Restart HAProxy:
systemctl restart haproxy
systemctl status haproxy --no-pager
Confirm it’s listening:
ss -nltp | egrep ':6443|:22623|:80|:443'Those ports are the standard set used for API, Machine Config, and Ingress load balancing in UPI/bare-metal style installs.
Step 5: Generate the OpenShift installer ISO (Agent-based / Assisted flow)
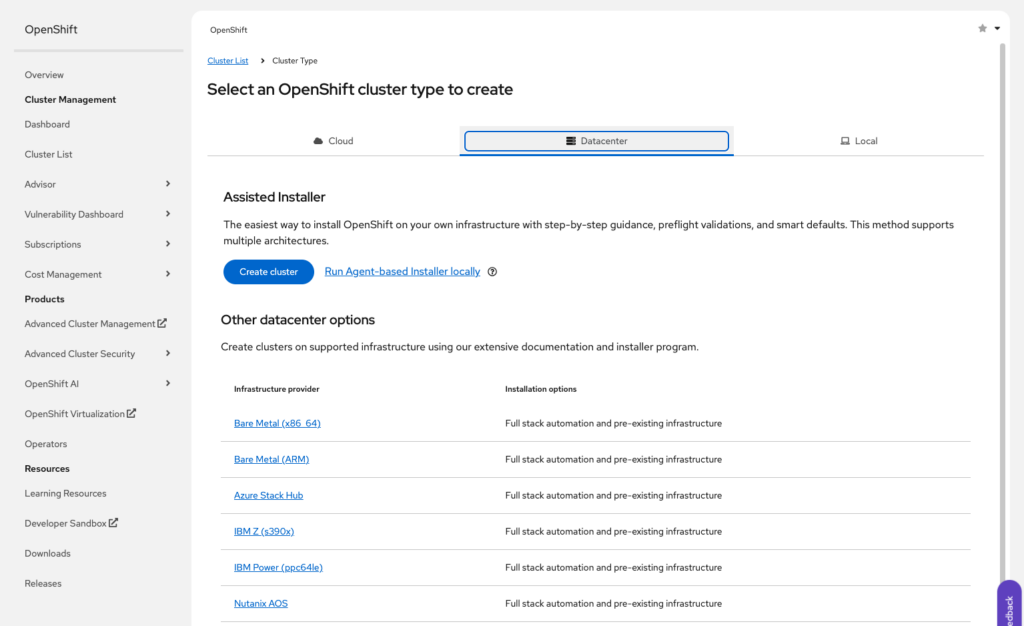
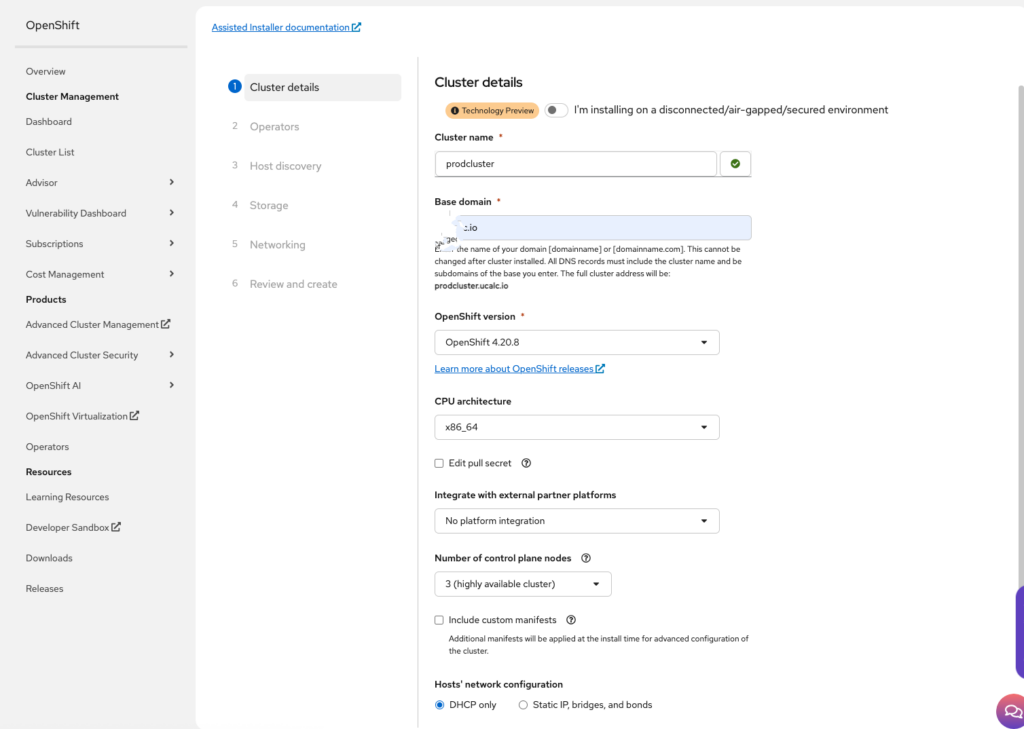
Now we are ready to start the OpenShift installation, visit https://console.redhat.com/openshift/overview and Click on Cluster Management. Select “Datacenter” then “Create Cluster” and finally “Bare Metal”.
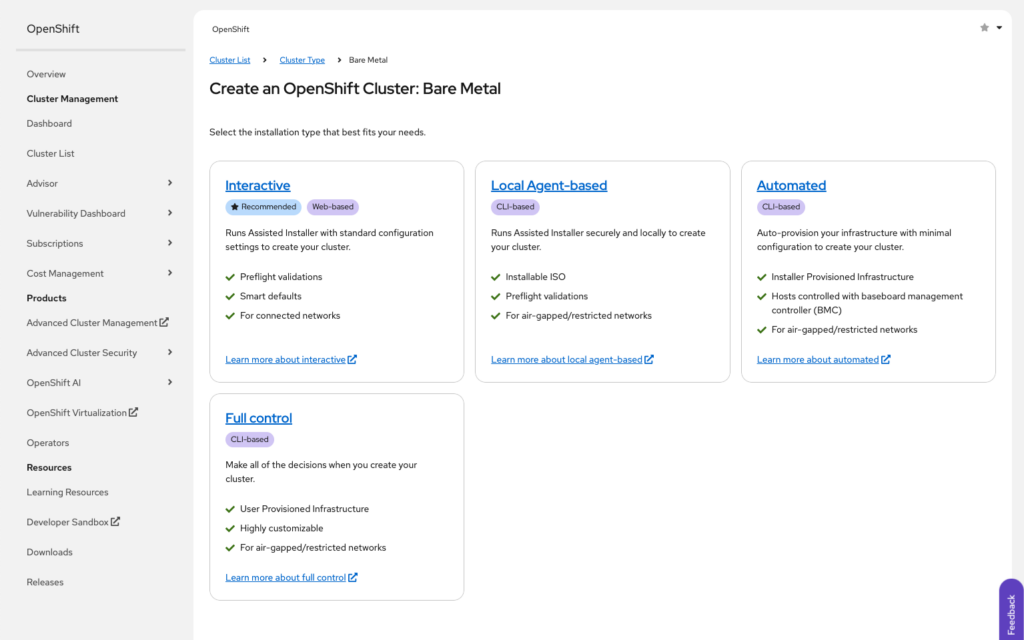
Next we select “Interactive”
And we can begin setting the cluster details
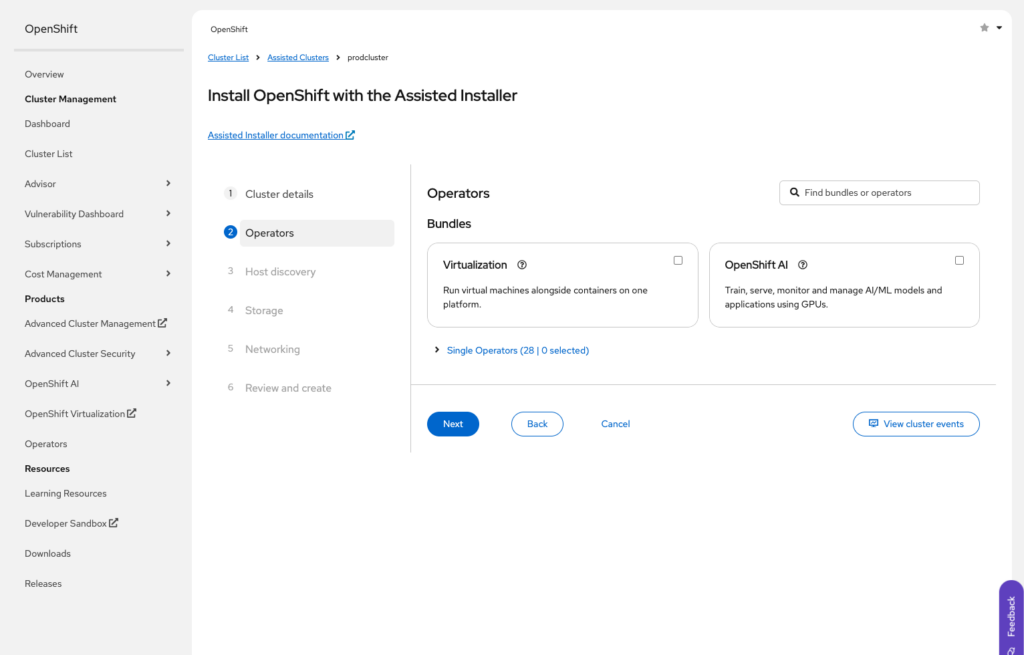
Operators ( we will not install any operator other than those preselected.)
Next we move on to Host Discovery
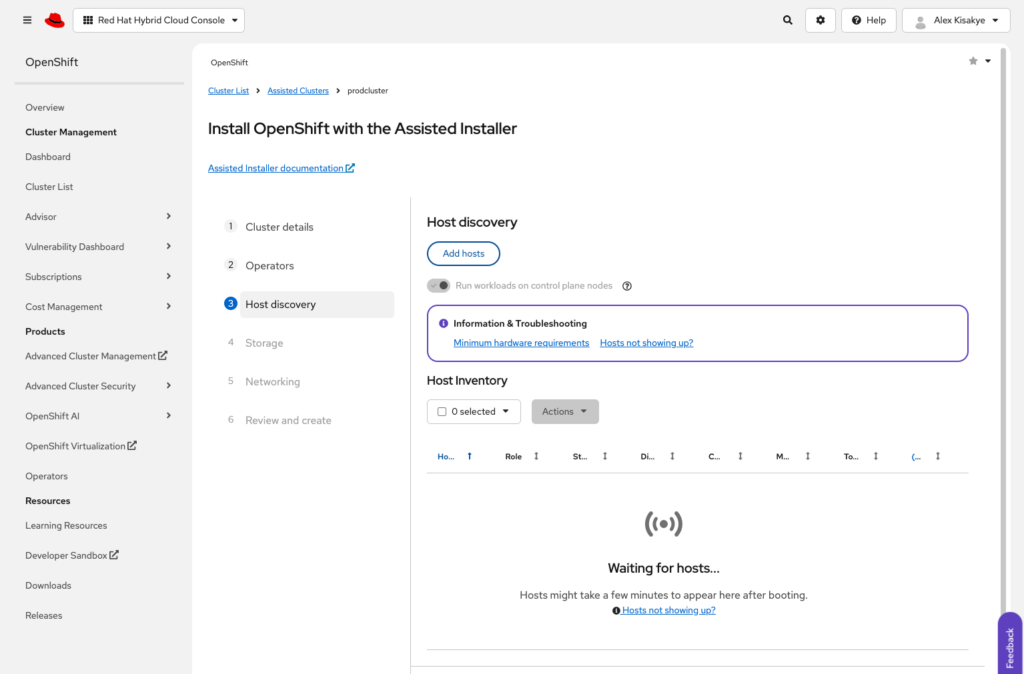
Click on Add hosts to download the iso image we are going to use to boot our instances
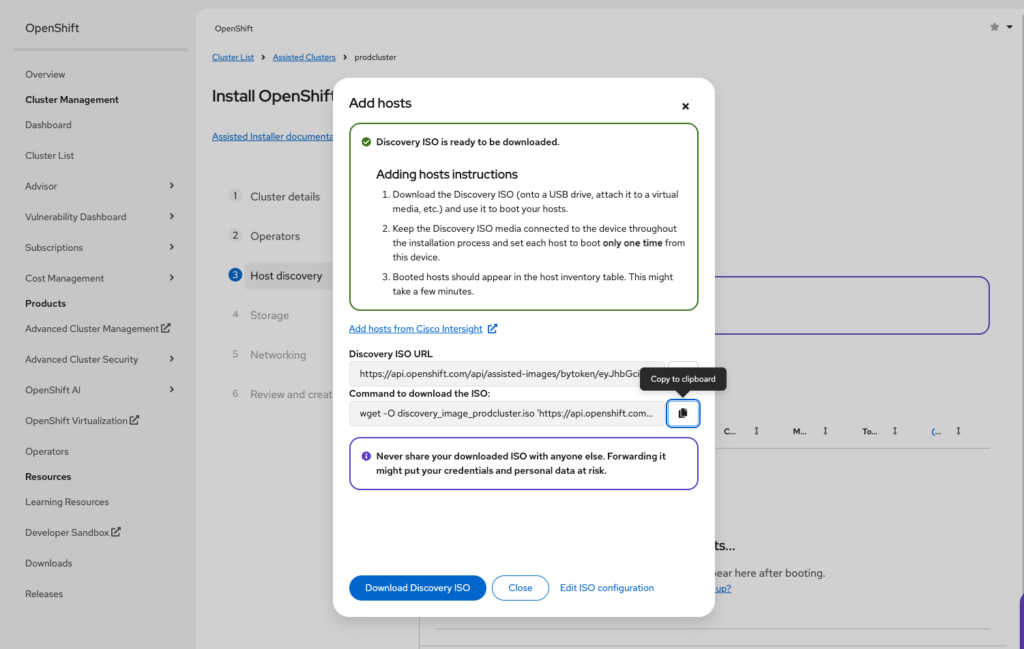
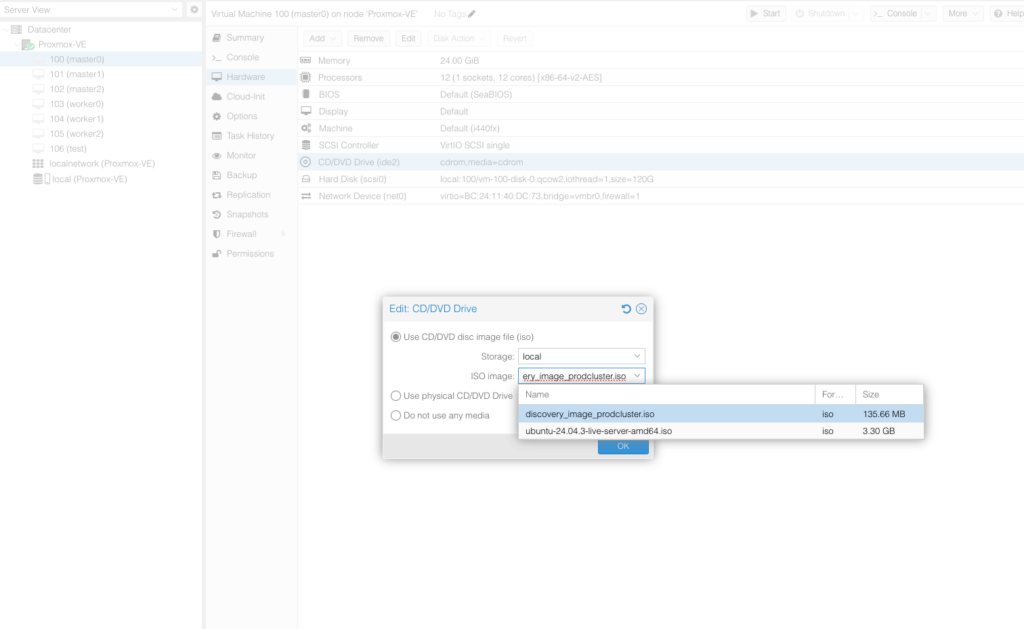
Now with our image in hand we can upload it to Proxmox using scp or even just run the wget command directly on the Proxmox instance. Be sure to save the image in location “/var/lib/vz/template/iso/” so that the guest vms are able to locate it. Edit each of the vms settings making this image as the default boot image.
Now we are ready to boot our instances. Start the guest instances making sure they actually boot from the iso image created and downloaded in the previous steps.
Instances will begin showing up in the Hosts Discovery part of the RedHat portal.
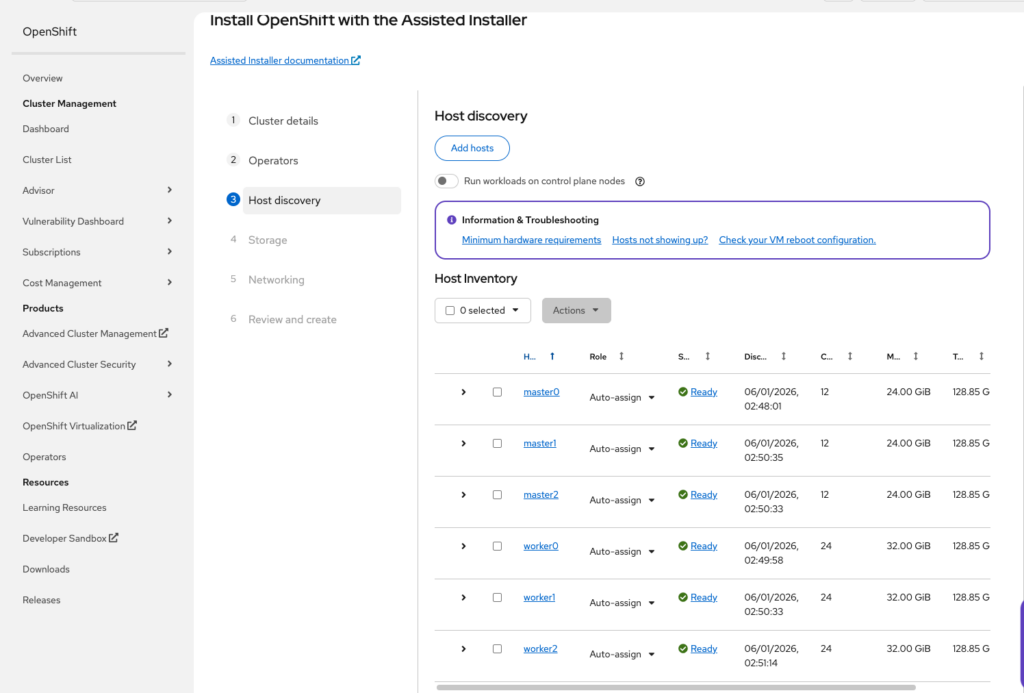
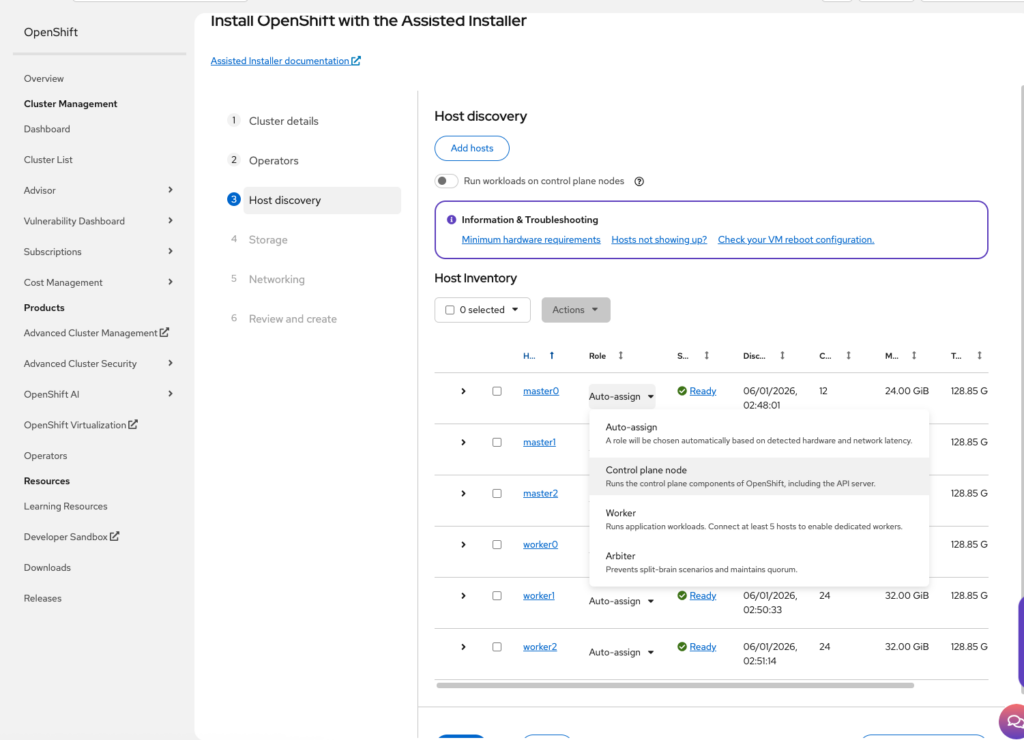
Before moving on, select the role of each discovered instance and set it as required.
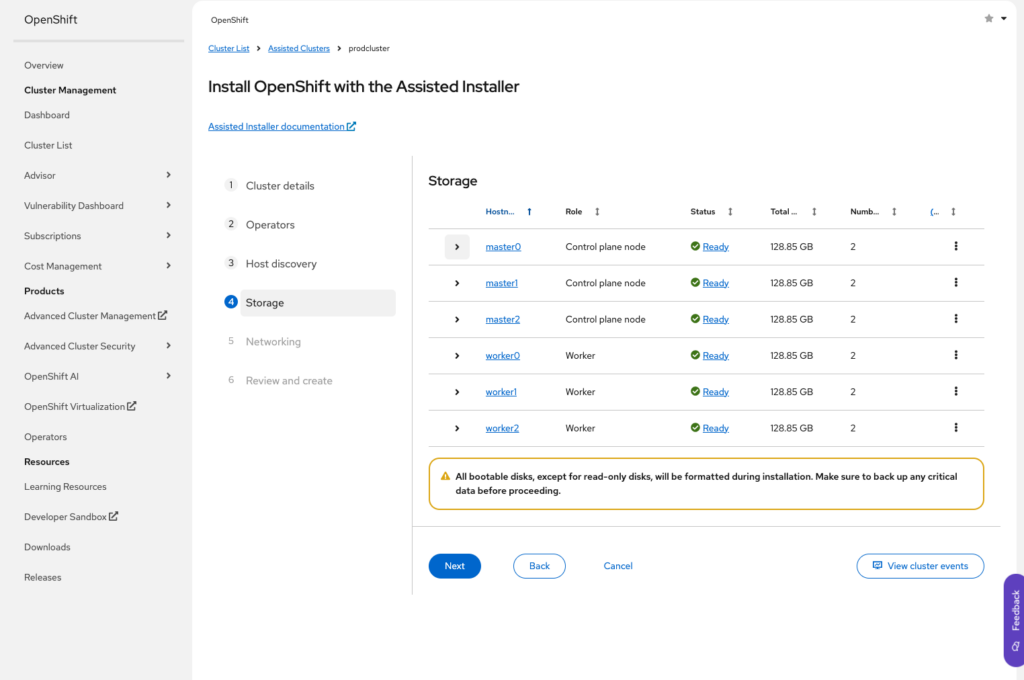
Click Next to move on to storage, We don’t need to make any changes here
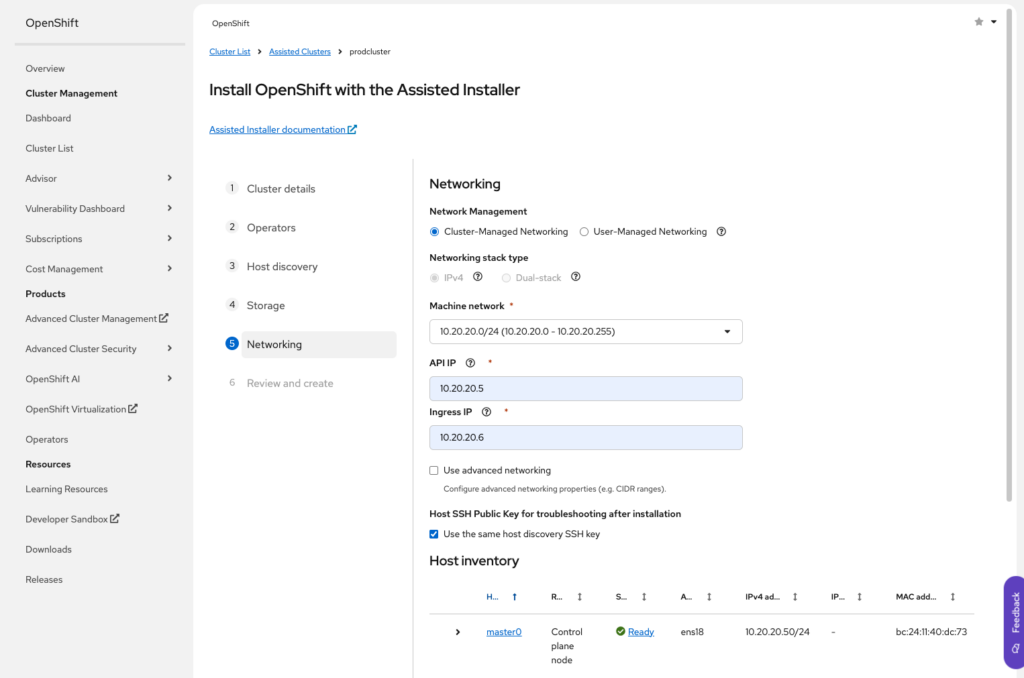
On to networking, we need to set network and set the API IP and Ingress IP as they are set in the HAProxy config, if you maintained the previous example, your API IP and Ingress will be 5 and 6 respectively
Now we are ready to review and proceed with the installation.
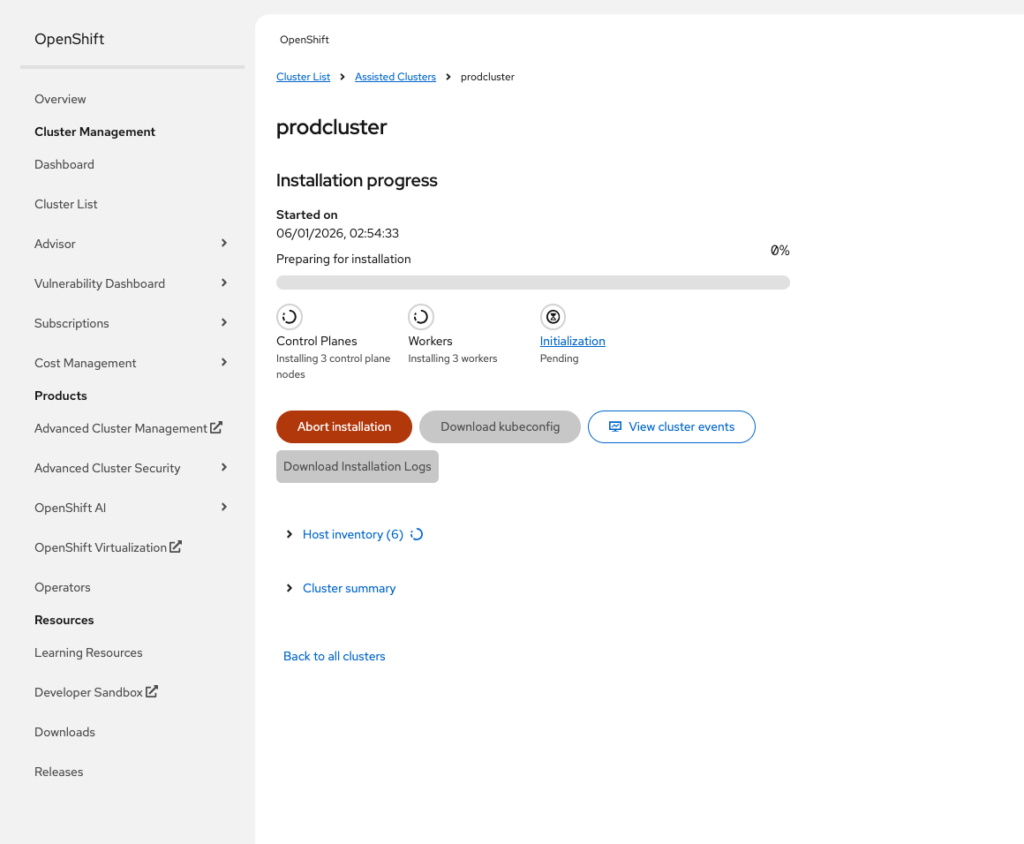
And finally, the long wait is over

If you click on the web console URL, given your dns is set correctly, you should access the portal. Otherwise, you might need to add this url to your DNS
Step 6: Validate cluster health after install
Once the installer completes, you can validate from a machine with oc configured:
% oc get clusterversion
NAME      VERSION   AVAILABLE   PROGRESSING   SINCE   STATUS
version   4.20.8    True        False         22m     Cluster version is 4.20.8

% oc get nodes
NAME      STATUS   ROLES                  AGE   VERSION
master0   Ready    control-plane,master   22m   v1.33.6
master1   Ready    control-plane,master   22m   v1.33.6
master2   Ready    control-plane,master   22m   v1.33.6
worker0   Ready    worker                 22m   v1.33.6
worker1   Ready    worker                 22m   v1.33.6
worker2   Ready    worker                 22m   v1.33.6
You’re looking for:
- Nodes in
Ready
Also validate your routes (apps):
oc get route -A | headStep 7: OC cli operations
In order to be able to use the local oc cli utility, you need to authenticate yourself against the cluster.
oc login --username=kubeadmin --server=https://api.prodcluster.demo.io:6443Conclusion
Installing OpenShift on Proxmox is absolutely doable and it’s one of the best ways to build a serious home lab that behaves like real on-prem OpenShift. The key is treating your Proxmox host like a mini data center: give your cluster a dedicated network, provide predictable DNS/DHCP, and put HAProxy in front of the critical OpenShift endpoints (API, machine config, and apps).
Once you’ve built this foundation, you can confidently move into the “fun stuff”: installing OpenShift Virtualization, adding ODF storage, building CI/CD, and running production-like workloads while still keeping everything under your control in Proxmox.